Start Here — Zero to Production
After this chapter you can
- Understand Start Here — Zero to Production
What you are going to build#
By the end you will have, running and reachable on the public internet:
- A three-tier AWS network across three availability zones
- A self-managed Kubernetes cluster — 3 control plane nodes, autoscaling workers, built with
kubeadm - A CI pipeline that builds, tests, scans and refuses to publish insecure images
- A GitOps delivery loop where a
git pushbecomes a running rolling update with no human touching the cluster - Observability that tells you when it breaks, and runbooks that tell you what to do
Not a demo. Each piece is the version you would defend in a design review.
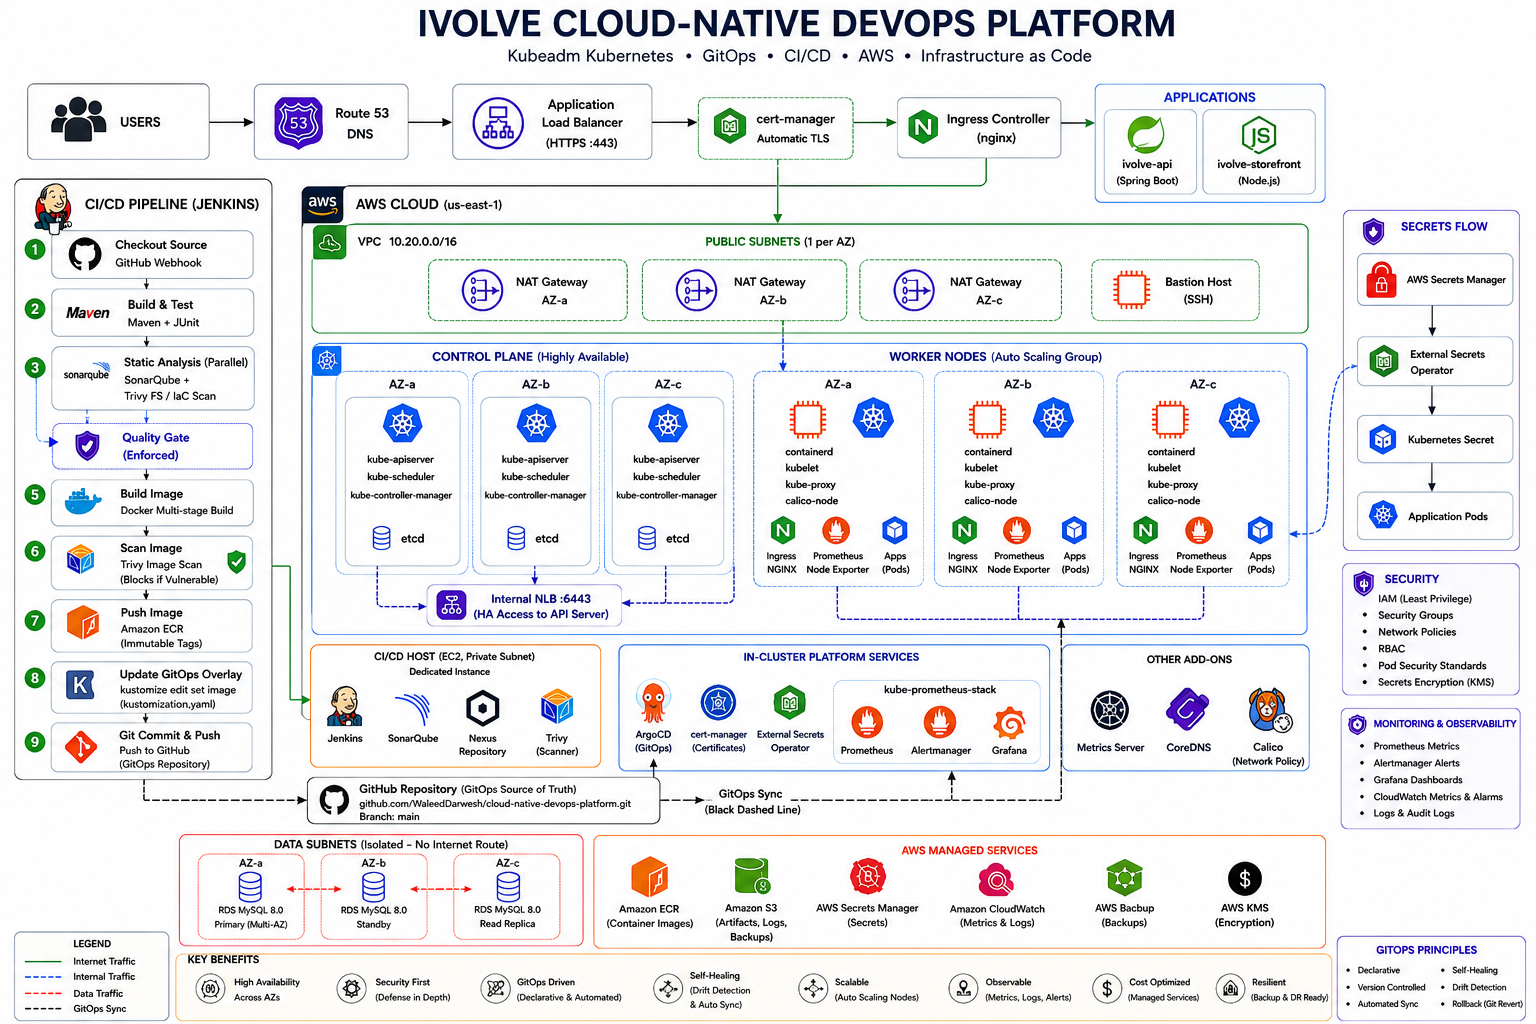
This is the destination. It is supposed to look like a lot right now — by the end of Phase 7 you will have built every box on it, and you will know why each one is there.
Before you start: the honest prerequisites#
Most tutorials skip this and you find out three hours in. Here is the truth.
You must already be comfortable with#
| Skill | Why | If not, read |
|---|---|---|
| A Linux shell | Everything happens over SSH | Chapter 05 |
| Git basics — commit, branch, push | GitOps is entirely git | Chapter 07 |
| What an IP address and a subnet are | You will design a VPC | Chapter 06 |
| YAML syntax | 90% of what you will write | any 20-minute primer |
You do not need prior Kubernetes, Terraform, or AWS experience. Those are taught here from zero.
You must have#
- An AWS account with billing enabled. The free tier does not cover this.
- A domain name in a Route53 hosted zone. ~$12/year.
- A credit card you are willing to put ~$180 on. See the cost section below.
- ~40 hours. Spread over 3–6 weeks is better than a single sprint.
Install these locally#
# Verify all at once. Anything MISSING must be installed before Phase 2.
for t in git terraform ansible aws kubectl helm kustomize jq docker; do
  printf '%-12s %s\n' "$t" "$(command -v $t 2>/dev/null || echo MISSING)"
done| Tool | Minimum | Install |
|---|---|---|
| Terraform | 1.6 | terraform.io/downloads |
| Ansible | 9.0 | pipx install ansible |
| AWS CLI | 2.15 | aws.amazon.com/cli |
| kubectl | 1.30 | kubernetes.io/docs/tasks/tools |
| Helm | 3.15 | helm.sh/docs/intro/install |
| kustomize | 5.4 | kubectl has it built in, but standalone is needed by CI |
The money conversation#
Read this before Phase 2. More people abandon this kind of project because of a surprise bill than because of a technical wall.
| Environment | Monthly | What you get |
|---|---|---|
dev | ~$180 | 1 control plane, 2 small workers, shared NAT, db.t3.small |
staging | ~$600 | production topology, smaller instances |
prod | ~$1,300 | 3 control planes, 4 large workers, Multi-AZ RDS + replica |
Build dev only. It exercises every code path in this course. Nothing in
the learning is gated behind production sizing.
The three things that actually cost money, in order:
- EC2 instances — the biggest line item.
devusest3.medium. - NAT gateways — ~$32/month each, plus data.
devshares one;prodruns three. This surprises everyone. - RDS Multi-AZ — doubles the instance cost.
devruns single-AZ.
Destroy what you are not using#
Destructive — This removes real resources. Check which environment you are in first.
cd Cloud-Native-DevOps-Platform/infrastructure/terraform/environments/dev
terraform destroy
Make this a habit at the end of every session. Rebuilding takes 45 minutes and
costs nothing; leaving dev running for a forgotten month costs $180.
Set a billing alarm before Phase 2:
aws budgets create-budget --account-id "$(aws sts get-caller-identity --query Account --output text)" \
  --budget '{"BudgetName":"learning-cap","BudgetLimit":{"Amount":"200","Unit":"USD"},"TimeUnit":"MONTHLY","BudgetType":"COST"}'
The build path#
Seven phases. Each has a checkpoint — a command that proves the phase worked. Do not move on until the checkpoint passes; a broken foundation produces failures three phases later that look like something else entirely.
Phase 0  Foundations         ~6h   read + local practice, no AWS spend
Phase 1  Containerize        ~4h   Docker, the app, local Compose
Phase 2  Infrastructure      ~6h   Terraform → VPC, EC2, RDS      ← spend starts
Phase 3  The cluster         ~8h   Ansible → kubeadm, Calico, ingress
Phase 4  Deploy manually     ~5h   kubectl, manifests, Helm — feel the pain first
Phase 5  CI                  ~6h   Jenkins, SonarQube, Trivy
Phase 6  GitOps              ~4h   ArgoCD — remove yourself from the deploy path
Phase 7  Day 2               ~6h   monitoring, alerts, backup, chaos
Phase 0 · Foundations#
~6 hours · no AWS spend · nothing to break
Read, and practise locally. Resist the urge to skip to the fun part — every hour here saves three later.
| Read | Then do |
|---|---|
| 05 — Linux | SSH into anything. Read a systemd unit. Follow a log with journalctl -f. |
| 07 — Git & GitHub | Branch, commit, open a PR, revert a commit. You will do all four constantly. |
| 06 — Networking | Explain to yourself what a /16 and a /20 are, and what NAT does. |
| 01 — Project Overview · 02 — Architecture | Look at diagrams/architecture.txt and find each component in it. |
| 10 — AWS | Create an IAM user with MFA. Stop using the root account. |
Checkpoint — you can answer, without looking:
- What does
10.20.0.0/16mean, and roughly how many addresses is it? - Why can a server in a private subnet reach the internet, but the internet cannot reach it?
- What is the difference between
git revertandgit reset --hard?
If any of those are shaky, stay here. Everything downstream assumes them.
Phase 1 · Containerize#
~4 hours · no AWS spend
Build and run the application on your laptop. You cannot debug a container in Kubernetes if you cannot debug it on your own machine.
| Read | Then do |
|---|---|
| 08 — Build tools | mvn clean package the API. Understand what a .jar is. |
| 09 — Docker | Read application/ivolve-api/Dockerfile. Explain why it has two FROM lines. |
cd Cloud-Native-DevOps-Platform/application/ivolve-api

mvn -B clean package                      # produces target/ivolve-api.jar
docker build -t ivolve-api:local .
docker run --rm -p 8080:8080 ivolve-api:local

# in another terminal
curl localhost:8080/actuator/health/liveness
Understand before moving on:
- Why is the build in a separate stage from the runtime? (Hint:
docker historythe image and look at what isn't there.) - Why does the runtime stage create a user and
USER ivolve? What breaks if you delete that line — and why does it matter later, at Phase 4?
Checkpoint
docker run --rm ivolve-api:local id      # must NOT print uid=0(root)
docker image ls ivolve-api:local         # should be ~200MB, not ~700MB
If it prints uid=0, the container runs as root and the restricted Pod
Security Standard in Phase 4 will reject it. Fix it now, not then.
Phase 2 · Infrastructure#
~6 hours · spend starts here · ~$180/month once running
| Read first | Why |
|---|---|
| 13 — Terraform | you are about to run it against a real account |
| 11 — VPC · 12 — IAM | you need to understand what you are creating |
| 15 — RDS · 17 — Auto Scaling | the expensive parts |
2.1 The state backend, once per account#
State cannot live in the bucket that holds state. This bootstraps that chicken-and-egg.
cd Cloud-Native-DevOps-Platform/infrastructure/terraform/bootstrap
terraform init
terraform apply
2.2 Configure the environment#
cd ../environments/dev
cp terraform.tfvars.example terraform.tfvars
Fill in four values:
key_pair_name       = "your-existing-ec2-keypair"
trusted_admin_cidrs = ["YOUR.IP.ADDR.ESS/32"]   # curl ifconfig.me
domain_name         = "yourdomain.com"
acm_certificate_arn = "arn:aws:acm:us-east-1:...:certificate/..."
trusted_admin_cidrsrejects0.0.0.0/0— a variable validation refuses it. That is deliberate. Opening SSH to the world is the single most common way a learning project becomes a crypto miner.
2.3 Plan, read the plan, apply#
terraform init
terraform plan -out=tfplan
Actually read the plan. Not as a ritual — find these things in it:
- How many resources? (Should be ~80.)
- Find the
aws_db_instance. What is itsinstance_class? - Find the
aws_nat_gateway. How many? (dev= 1; that is the cost decision.)
terraform apply tfplan     # ~15 minutes, mostly RDS
terraform output
Checkpoint
terraform output bastion_public_ip
ssh ubuntu@$(terraform output -raw bastion_public_ip) 'echo reachable'
If SSH hangs, your public IP changed or is not in trusted_admin_cidrs. That
is the security group working correctly.
What you just built — go look at it in the console, then find each one in
infrastructure/terraform/modules/:
- a VPC with public, private and database subnets in 2 AZs
- EC2 instances with no public IP except the bastion
- an RDS instance with a password you have never seen, in Secrets Manager
- an ALB with nothing behind it yet (that comes in Phase 3)
Phase 3 · The cluster#
~8 hours · the heart of the project
| Read first |
|---|
| 19 — Kubernetes — the concepts |
| 20 — Kubeadm — how a cluster is actually born |
| 14 — Ansible — how we drive it |
| 34 — Network Policies — why Calico, not Flannel |
3.1 Secrets#
cd ../../../ansible
cp group_vars/vault.yml.example group_vars/vault.yml
$EDITOR group_vars/vault.yml         # fill in real values
ansible-vault encrypt group_vars/vault.yml
echo 'your-vault-password' > .vault_pass && chmod 600 .vault_pass
3.2 Prove connectivity before running anything#
export IVOLVE_BASTION_IP=$(cd ../terraform/environments/dev && terraform output -raw bastion_public_ip)

ansible-galaxy collection install -r requirements.yml
ansible-inventory --graph     # must list control_plane, worker, cicd
ansible all -m ping           # must be green for every host
If
--graphis empty, the dynamic inventory found no hosts. Check the EC2 tags: the plugin filters onProject=ivolve. This is the single most common Phase 3 failure and it looks like an Ansible bug when it is a tagging problem.
3.3 Build the cluster#
Run it in stages the first time. You will learn far more than from one 25-minute
site.yml run, and a failure tells you exactly which stage broke.
ansible-playbook playbooks/site.yml --tags baseline     # hardening, ~3 min
ansible-playbook playbooks/site.yml --tags kubernetes   # kubeadm, ~10 min
ansible-playbook playbooks/site.yml --tags addons       # ingress, storage, certs
While --tags kubernetes runs, watch what it does. It is doing, in order:
disable swap → load kernel modules → install containerd → set the systemd
cgroup driver → install kubeadm → kubeadm init → install Calico → kubeadm join.
Every one of those steps is a chapter. This is where the reading pays off.
3.4 Get access#
cd ../..
./scripts/get-kubeconfig.sh dev
kubectl get nodes -o wide
Checkpoint
kubectl get nodes                     # all Ready
kubectl -n kube-system get pods       # all Running, no CrashLoopBackOff
kubectl get --raw /readyz             # ok
If nodes are NotReady — almost always the CNI. kubectl -n calico-system get pods. If calico-node crash-loops, your pod_network_cidr overlaps the
VPC CIDR.
If pods hang in ContainerCreating — containerd's cgroup driver does not
match the kubelet's. grep SystemdCgroup /etc/containerd/config.toml must say
true. This is the classic kubeadm failure.
Phase 4 · Deploy manually#
~5 hours · do this before automating it
This phase is deliberately manual. Automating a deployment you have never done by hand produces someone who can run a pipeline but cannot fix one.
| Read | Then do |
|---|---|
| 19 — Kubernetes | apply the base manifests one file at a time |
| 21 — Helm | install the same thing as a chart, compare |
| 22 — Kustomize | see how overlays differ from templating |
cd Cloud-Native-DevOps-Platform

# One at a time. Read each file before applying it.
kubectl apply -f kubernetes/base/namespace.yaml
kubectl apply -f kubernetes/base/configmap.yaml
kubectl apply -f kubernetes/base/api-deployment.yaml

kubectl -n ivolve get pods -w
Now break it on purpose. This is the most valuable hour of the whole course:
# 1. Point at an image tag that does not exist
kubectl -n ivolve set image deploy/ivolve-api ivolve-api=ivolve-api:nope
kubectl -n ivolve get pods          # ImagePullBackOff
kubectl -n ivolve describe pod <pod> | tail -20   # read the Events

# 2. Delete a pod and watch it come back
kubectl -n ivolve delete pod <pod>
kubectl -n ivolve get pods -w       # the ReplicaSet replaces it

# 3. Break the readiness probe and watch traffic drain
kubectl -n ivolve edit deploy ivolve-api   # change readiness path to /nope
kubectl -n ivolve get endpoints ivolve-api # the pod IP disappears
Understanding why the endpoint list empties is the difference between knowing Kubernetes vocabulary and knowing Kubernetes.
Checkpoint
kubectl -n ivolve rollout status deploy/ivolve-api
kubectl -n ivolve run probe --rm -it --restart=Never --image=curlimages/curl:8.8.0 \
  -- curl -sf http://ivolve-storefront/healthz
Phase 5 · Continuous Integration#
~6 hours
| Read |
|---|
| 23 — Jenkins · 25 — ECR |
| 33 — Security — the scanning gates |
| 26 — Nexus |
cd infrastructure/ansible
ansible-playbook playbooks/site.yml --tags cicd     # ~15 min
Then wire the GitHub webhook: repository → Settings → Webhooks →
https://jenkins.<your-domain>/github-webhook/, content type application/json,
push events only.
Now make the pipeline fail, deliberately. A gate you have never seen fire is a gate you do not trust:
- Break a test. Push. Watch the pipeline stop at stage 2. Nothing is built.
- Add a vulnerable dependency (an old
log4j, say). Push. Watch Trivy stop it at stage 3. Nothing is built. - Delete a unit test so coverage drops below 80%. Push. Watch the SonarQube quality gate abort the pipeline.
Checkpoint — a green run that ends with a commit to
kubernetes/overlays/dev/kustomization.yaml changing the image tag. Find that
commit in git log. That commit is the deployment.
Phase 6 · GitOps#
~4 hours · where it becomes a platform
| Read |
|---|
| 28 — ArgoCD · 27 — GitOps |
ansible-playbook playbooks/site.yml --tags gitopsThen do the demonstration that makes GitOps click:
# Change the cluster by hand, the way a panicking engineer would
kubectl -n ivolve scale deploy ivolve-api --replicas=7
kubectl -n ivolve get deploy ivolve-api

# Wait up to three minutes, then look again
kubectl -n ivolve get deploy ivolve-api
It goes back. selfHeal reverted you, because git said otherwise. That single
behaviour is the whole argument for GitOps: the cluster cannot drift from
what was reviewed and merged.
Now do a real deploy the real way:
git commit --allow-empty -m "trigger" && git push
# Jenkins builds → commits a tag → ArgoCD syncs → rolling update
watch kubectl -n ivolve get pods
Checkpoint — you changed production without ever running kubectl apply,
and git log shows who, what and when.
Phase 7 · Day 2 operations#
~6 hours · what separates "it works" from "you can run it"
| Read |
|---|
| 29 — Observability · 30 — Prometheus · 31 — Grafana |
| 40 — Disaster Recovery · 37 — Chaos Engineering |
| 42 — Troubleshooting — keep this open forever |
ansible-playbook playbooks/site.yml --tags monitoring
kubectl -n monitoring port-forward svc/kube-prometheus-stack-grafana 3000:80
Then run the exercises that prove it works:
# 1. Kill a node. Watch the ASG replace it and pods reschedule.
aws autoscaling terminate-instance-in-auto-scaling-group \
  --instance-id <worker-id> --no-should-decrement-desired-capacity

# 2. Snapshot etcd, and read the restore runbook until you could do it under pressure
sudo ./scripts/backup-etcd.sh dev

# 3. Deliberately trip an alert and watch it route
kubectl -n ivolve scale deploy ivolve-api --replicas=0
# DeploymentReplicasMismatch fires after 15 minutes
Final checkpoint
./scripts/health-check.sh dev # must exit 0You are done. Now what?#
Prove it to yourself#
Destroy the whole environment and rebuild it from nothing:
Destructive — This removes real resources. Check which environment you are in first.
terraform destroy
./scripts/bootstrap-platform.sh dev
If that works unattended, you have genuinely automated it. If it does not, you have found the manual step you forgot you did — which is exactly the thing that bites teams at 2am.
Prove it to other people#
- Screenshots while it is running. See
screenshots/README.mdfor the ten worth taking. Once youterraform destroy, they are gone. - Write the ADRs in your own words.
docs/adr/explains five decisions. Being able to argue them out loud is what an interview actually tests. - Read 44 — Interview Prep with the platform still running, so the answers are concrete rather than remembered.
Then extend it#
In roughly the order of value:
- Centralised logging (Loki) — metrics without logs is half an observability story
- Progressive delivery (Argo Rollouts) — catch the bad release that starts fine
- Image signing (Cosign) — scanning proves what is in an image, signing proves where it came from
- A second region — the honest gap in every HA table in this repo
When you get stuck#
In this order:
- Read the error. Actually read it. Kubernetes errors are unusually good.
kubectl -n <ns> describe pod <pod>— the Events at the bottom.kubectl -n <ns> logs <pod> --previous—--previousis the important flag for a crash loop; the current container has not logged anything yet.- Chapter 42 — Troubleshooting — the failures you will actually hit, with fixes.
docs/runbooks.mdin the platform — one entry per alert.
The single most useful habit: when something breaks, write down what you changed in the last ten minutes. It is almost always that. Contents | 01 — Project Overview |